
Introduction:

It took us quite a while before we got this kit. There wasn’t any problem with the seller, there were just some conflicts on the schedule when should I pick it up. And after a few days, I travelled to Metrowalk and picked it up there. Unfortunately, the water slide decals were late and the seller said it was still in transit, so I head home with just the main unit/kit. I have no choice but to wait and tell that to my client. The box was really huge and it was a real eye-catcher when I walked on the street looking for a jeepney back home. People would ask where I bought it, what kind of “robot” it was, or if my mom knows I am buying such stuff (LOL). And even when I was inside the jeepney, I got reactions from other commuters too that made my trip home less boring. One of the most memorable moments was when a little girl sat in front of me because she wanted to sleep on top of the box. And she keeps telling her mom that it’s a “big robot”. The stress I got from that long travel was erased by those nice moments.
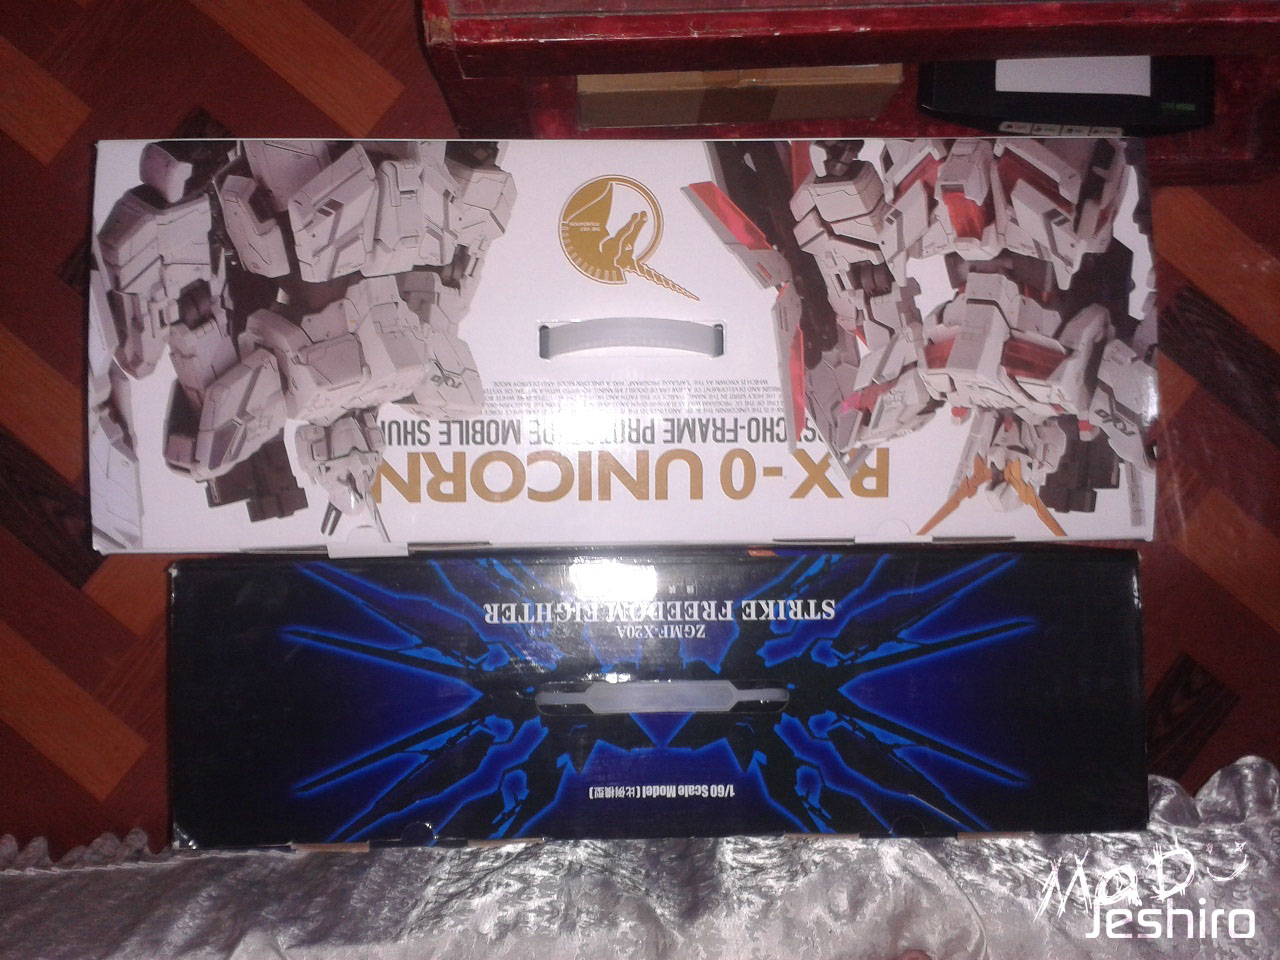
Before I started the “unboxing” for this monstrous model, I picked up the PG Strike Freedom box and compared the two. Back then when I see the box of the PG Strike Freedom in person and up-close, I know in my head that it’s a huge box. But after looking at the two boxes, the one for PG SF looked more like a little kid standing right next to an older person. You can see in the images below that the difference is really huge. For others, that may not be as surprising as it is because Dragon Momoko added a lot of stuff inside. You get more weapons and the weapon rack of some sort that also works as a mechanical arm.


I checked the internet first to get some ideas what to do regarding the LED and saved a couple of pictures from Dalong’s site. I checked the box’s contents after doing the size comparison to see if there were any damaged sprues. What I did isn’t my official unboxing segment though. It was more like a sneak peek. Anyways, I will share what I have experienced in this kit. I got a lot of tip that my fingers will suffer a lot and they were right. Now, if there are any typos and wrong terminologies used, please do correct me. :)
I also forgot a few pieces on some units on the “parts exploded view”. And you may notice that some of the watermarks are badly placed. I forgot to rotate the image so it was taken vertically instead of a horizontal shot.
Unboxing:


The box art here has the same concept from the previous kits in Dragon Momoko’s line. It has the same white overall background with the finished model standing. The model in Unicorn mode is on the other side and the Destroy mode on the other one. They didn’t use the word “Gundam” here and replaced it with Mobile Suit. Actually it’s "Mobile Shuit" and I’m not sure if that was intended with same idea from Daban or TTH replacing the word Gundam with “fighter”.


So you get 2 smaller boxes inside and you can see that the factory punched holes on them to pull them out easily. The box kind of reminded me the ones men used for cock fights. XD LOL

So it’s time to check the contents here.


The first box has 13 plastic bags and 2 of them are a resealable type. The first resealable pack has all the LED wires and the other has the battery case along with the remote which is also packed in another resealable plastic. Good thing that they packed the smaller green sprues inside the pedestal’s plastic bag. So that’s all the contents for the first box here.

And here are the contents of the second box.


There are 14 plastic bags here and I see lot of dark brown sprues. Here’s the v-fin in its own runner and the battery case cover for the pedestal. Another factor that caught my attention are the sprues for the beam sabers’ effects – the tip was bent to almost 90 degrees. At least 1 and half centimeter was bent and the stress mark was already noticeable at some angle. This may be an isolated case because I saw other builders who didn’t encounter such issue. This might have happened during packaging in the factory. It’s not a big deal and it will surely take a lot of time to just to order replacements from the seller. I am glad a lot of helpful builders and colleagues taught me that I can use hot water to fix it up. Well, I hope the result is good or I will be forced to cut it down instead. :/

So there are a total of 27 plastic bags that should be inside. The contents of each box may be different in other units, but at least you will get a hint of what’s inside and you can check if you have a missing plastic bag or item. Now as for the construction manual, it really looks good. The front page shows the Unicorn Gundam in Destroy Mode and the Unicorn Mode on the back. The first few pages show the gimmicks and other features of the model in Unicorn Mode. And you get to take a look at the features of the Destroy Mode on the last pages. Here’s a shot of the sprues’ list and there are 68 sprues listed (including the pedestal) but there were 70 I think on my count. How many parts in total? There are 1,069 pieces all including the pedestal. The next segment will be the sprues and other contents out of their plastic bags.
UPDATE (2017-02-27): As you can see, there are no batteries included in this kit. The battery for the remote is known as CR2032
Sprues:
|
|
|


|
|
|


|
|
|


|
|
|


|
|
|


|
|
|


|
|
|


|
|
|


|
|
|


|
|
|


|
|
|


|
|
|


|
|
|


|
|
|


|
|
|


|
|


So here’s what I noticed on the sprues. Aside from Runner G with the beam saber effects, some of the white sprues are different from other white ones in terms of texture. They have a matte look but the surface is still smooth. The other sprues have this really glossy finish I usually see in Daban Model. I’m not sure why Dragon Momoko made it this way and I hope it has a good look on a straight build. Please do take note that the coding of the sprues is different from Bandai’s. Example is the J runner in Bandai supposed to be thered psyco frame parts and the J runner here in Momoko are the PC parts.
Another factor before you begin, there are extra sprues in white that can be used to replace the brown part for the javelin. This will add some color instead of the usual brown one. This is a just a reminder because you might missed them during construction.
I would like to add this information that some of the sprues are molded badly. I saw one picture sent by a friend that the psyco frame parts on runner I1 and I2 have this issue. Check the sprues carefully before cutting them off so you can still replace them.


The other contents we already saw are the remote, battery case, and the LED. The LEDs have certain markings written on the small circuit board. But I had some trouble choosing the right wire so I looked on the construction manual’s drawing very carefully.
I don’t have any new X-Acto blades during this period and most of the bookstores don’t have a fresh stock yet.

After a week and a couple of days, a friend gave me a nice gift – a new X-Acto knife and a set of blades. One of my friends also gave me this Kratos brand coffee and I was very happy to taste a new coffee brand. So I guess it’s finally time to begin this project.

But before I started the kit, I took some surveys first and asked what I should use for panel lining – Uniball Signo Black versus the mechanical pencil. I got a lot of votes for the mechanical pencil so I will be using that.
Pedestal/ Action Base:
Just like the other kits, you start off with the pedestal.


So here are the parts including the huge base.


If you still remember what I said about the plastic having that matte look, here’s a good example. The surfaces have that “grainy” look but it still retains the smooth texture. But on the rear or back end of the pedestal, you can see that the surface is really shiny and glossy. You will see these on the Legs section as well.

I checked the LED if they are all working and everything looks good here. They have this bluish color and it was different from what I had in mind. I thought it was white or red, and I’m not sure if they will have a good effect inside the red psyco frame. One of the LED here is white which is obviously meant for the Head Unit. If you’re good with these parts, I think the white LED would be best for all the parts instead of the blue.


The manual shows where to put insert the wires. There were small gaps where you can push one wire at a time inside the cavities. One thing you should take note is how you push the wire. Do not use any object with sharp tips or edges when inserting the wires in their corresponding cavities. The wires are quite thin and the rubber covering them can be damaged so easily even with a finger nail. On my side, I covered the tip of screwdriver and pushed it in gently. But on most scenarios, it’s just my finger nail. :v

The pedestal also features the same adjustable stand where you can pull it up and use this small part to lock it in place, probably when you do the Destroy Mode since it will be taller.


Body Unit:

Here are the parts for the body unit. The parts separation is really outstanding because of the transformation gimmick.

Achievement Unlocked - First Blood. :v
I encountered a lot of tight pegs here and there in the Body Unit, but there were no big issues where I had to scrape the female peg or sand the male pegs just to fit them in. But there were several cases where I had no choice but to trim some bits on the pegs. One of these cases is this one in the picture. This portion on section B should slide through here in section A.

There is no need to trim this portion actually, but the PC parts from Runner J and Runner A1 has a tendency to pop off or slide out during movement. The width is extended by a very small amount but the effect is really bothersome because it’s making the joints or parts like these in the picture become very tight.


This is what the LED wire looks like for the Body Unit. You can see the marking or the text written on the PCB that gives you a brief reminder what it's for.

Before you can finish the armor, the LED will be added here and you should make sure that each wire are inserted correctly on their designated cavities.


You will also notice that the back plating or armor will be placed last after you add the arms. On my side, I already attached them (C3 and C4) and they were still easy to remove. The instruction isn’t hard to understand, and my issue here is placing them without damaging the wires – it was time consuming.


I will add some metallic red on those oblong “vents” for more color. And I would like to apologize for the blurry pictures. :v


So here’s the Body Unit in Destroy Mode and this is the most common set-up other builders would do if they want to highlight the LED inside. The transformation gimmick is somewhat similar to the MG version so everything is a bit familiar when sliding this and that. I would like to point out that the transformation gimmick on all parts (body, arms, legs) are quite tiring because of the tight parts and/or joints.

On Daban’s PG Unicorn and Unicorn Banshee, this small part on top has a tendency t break off when you lift it up. Fortunately even with the huge amount of tight pegs, this one can be pulled up nicely using any blunt-tip object. Even my own fingernail can lift this up without damaging the red clamp.
Take note that the lock on the back pops off quickly because of the wires.


As for the articulated parts, these pegs on left and right can be lifted out giving you an extended range in movement. But the movement range will be decreased to a certain degree once you place the shoulder armor.


This is the result after adding the metallic red on those oblong sections. I and my other friend used to call them “semi-vents”. I will clean the excess ink after drying them up.
Leg Unit:


The amount of parts placed on top of my cutting mat was overwhelming. I had to place the other parts on a small paper and took two pictures here. So yeah, these are the parts for a single leg. I remember the MG version having lots of parts too. But because of the gimmicks on the legs, a lot of extra pieces for the inner frame were added.

If you look at the construction manual, the drawing shows a 3-LED connection ( I don’t know what to call them LOL). But yeah, there are 3 LED connected in a single wire which is designed for the leg. As you see in the image, the LF wire will be used on the leg. The RF is for the right one and I already built it firsthand before doing the exploded view. I don’t think you will need to be very specific on what the markings says where they should be attached. Like the LF wire, they have the same connector and I think if you switched it by accident, you can attach the LF wire on the right leg instead. Same goes for the RF wire if and only if you mistakenly placed the wrong marking. I did tested out other wirings like the leg attached on the end-part of the wire meant for the arms and they still lit up. Most builders won’t need this kind of information. But I think it’s better to be safe than sorry right?
So, do take note that the legs will use a 3-LED wire and the arms will use a 2-LED one. You may switch the RF and LF on either leg but that doesn’t mean you can use the other pair for the leg which is designed only for the arms.


After placing the LED wires on the cavities, I connected it on the body to check if there were any damages. Like I said on my review in PG Wing-Gundam Zero Custom, you should always check the LEDs after building a certain part to see if they are still working.

That’s lame of me to miss 2 parts for the leg’s inner frame. :v
The only main issue here were the tight pegs again. I trimmed or scraped the female pegs a bit to make them fit easily, otherwise there would be a visible seam. Forcing the two parts to fit is kind of risky as it may have the tendency to produce stress marks and the worst-case scenario is breaking the pegs. Of course there were minor ones that I will share later.


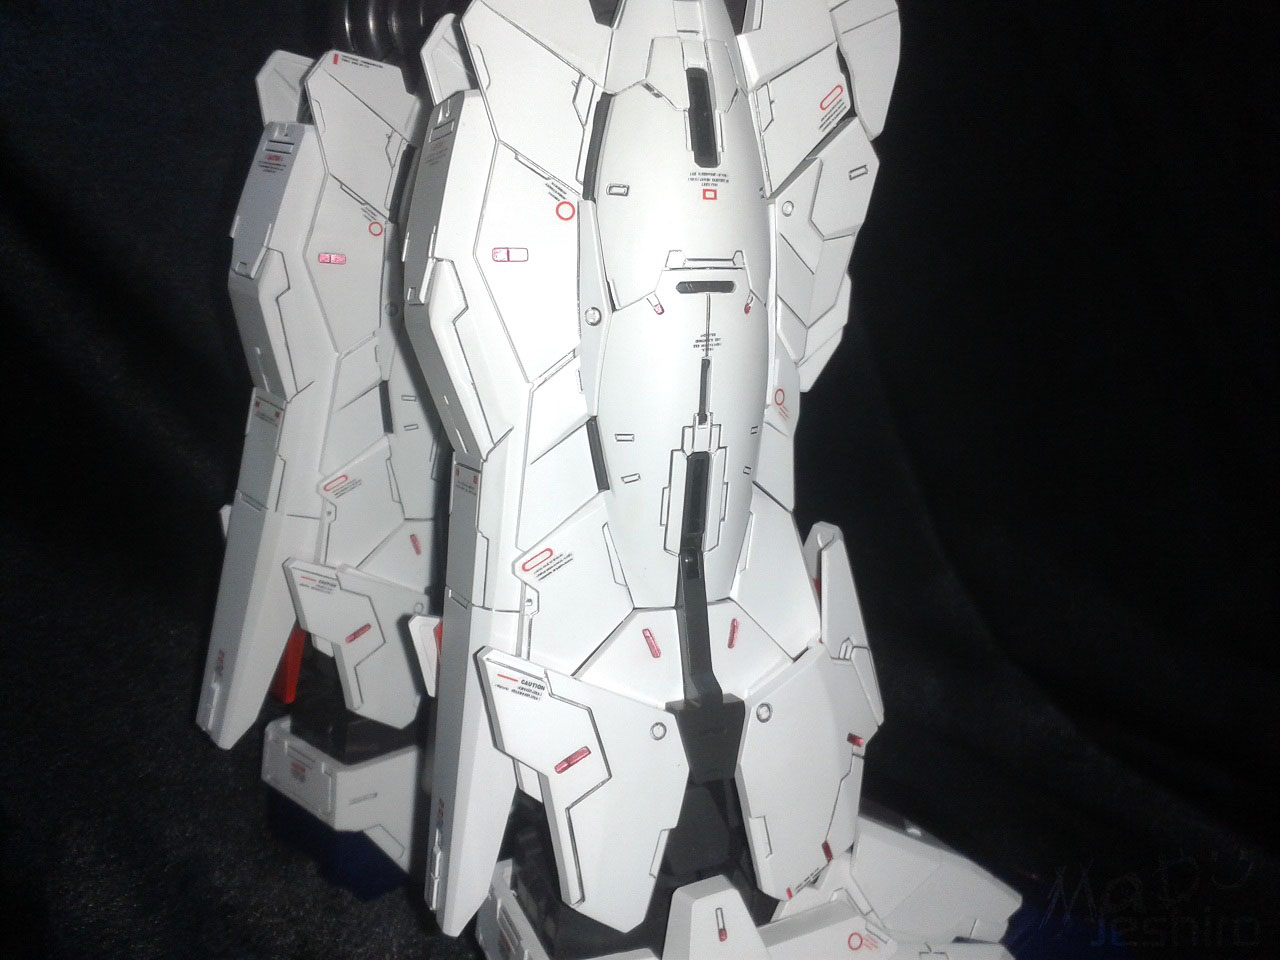
So here’s the Leg Unit in Unicorn mode and in Destroy mode. The height difference is really noticeable and the Destroy Mode is really huge. Detailing is really outstanding and you can see a lot panel lines again and other sections with raised surfaces. The red psyco frame adds some balance against the highly detailed leg, so it won’t take the limelight. Of course the red psyco frame will be the main attraction once the LED is lighted up in a dark spot of your room.


Articulation isn’t bad, but the range of movement is limited due to the leg’s design same with the MG version. The other minor issues here are that there are some points when I move the leg (in Destroy Mode), the outer armor on the thigh flips up or slides out of its lock. It’s not a big deal because the unit will just stand on the pedestal. The hatches or armors on the side of the leg that shows more of the psyco frame also has a tendency to get removed easily.
This white armor piece on the knee (F7) that will lock on the clamp in the psyco frame has a minor issue. The inner frame attached (S33) has a square peg and not a rounded one. I trimmed it a bit so it would lock on the psyco frame. Putting them back to Unicorn Mode also has issues and I get nervous when I hear that snapping sound from the side leg armors.
Another issue I might want to add is the wire on the thigh part. The wires were long and there are no specific guides on the construction manual to this point how to keep it away from being hit by the sliding inner frame. On my side, I looked at the inner frame mechanism and saw that there’s a small gap and moved the wire to pass through that gap. I can feel that the inner frame still grinding on the wires inside so I decided to transform it in Destroy Mode when completed. I apologize I didn’t took a picture on this issue because I was avoiding mockery why I have a bad set up for the wires.
Be sure to follow the manual piece by piece but I will cover some advice about the LED part. I also got myself in an accident when I was building the second leg. What I didn’t know is that I just covered the cavity where the wire should go through so I had to remove that tight inner frame part again.


Here's the right leg when before I built the left. I added some detailing first and planned through where to place those metallic red.
But overall, it was a fun experience because everything was new to me. The issues were not a bother and I just focused on building it and planned on the extra details I can add using uniball signo. :)
So that’s all for the legs and you can share any issues if there were more.
Waist Unit:

The waist unit also boast in excellent parts separation. I added the parts for the side skirts too. Again, the main issue here are tight pegs especially on the inner frame section. The lock on the crotch doesn’t have any issues and stays in place.
I also noticed a loose parts here but they were not much of a big issue. A certain part here that acts as a movebale clamp gets removed so easily, which I will show below when the waist is done.

I now need a coffee break before adding the led here. It kind of looks tricky on the manual but it was actually easy.


Okay here is you LED for the waist and there’s a lot connected to each other. The two small connectors (A) are for the legs and the bigger one on the left side (B) will be connected to the body. To easily remember them, the connectors for the arms and legs only have 2 pins.


You will also notice these markings on the LED’s board. I’m not sure what the RW and LW stands for but we can use the words Right Waist and Left Waist. :P

Follow the manual carefully while checking the LED’s markings. There will be locks that will cover the LED on the back, side, and front skirts.
I would like to point some info again here. There are drawings on the position of the LED on what direction they should face. But that doesn’t mean the construction manuals are always correct. Take these 2 images as an example.
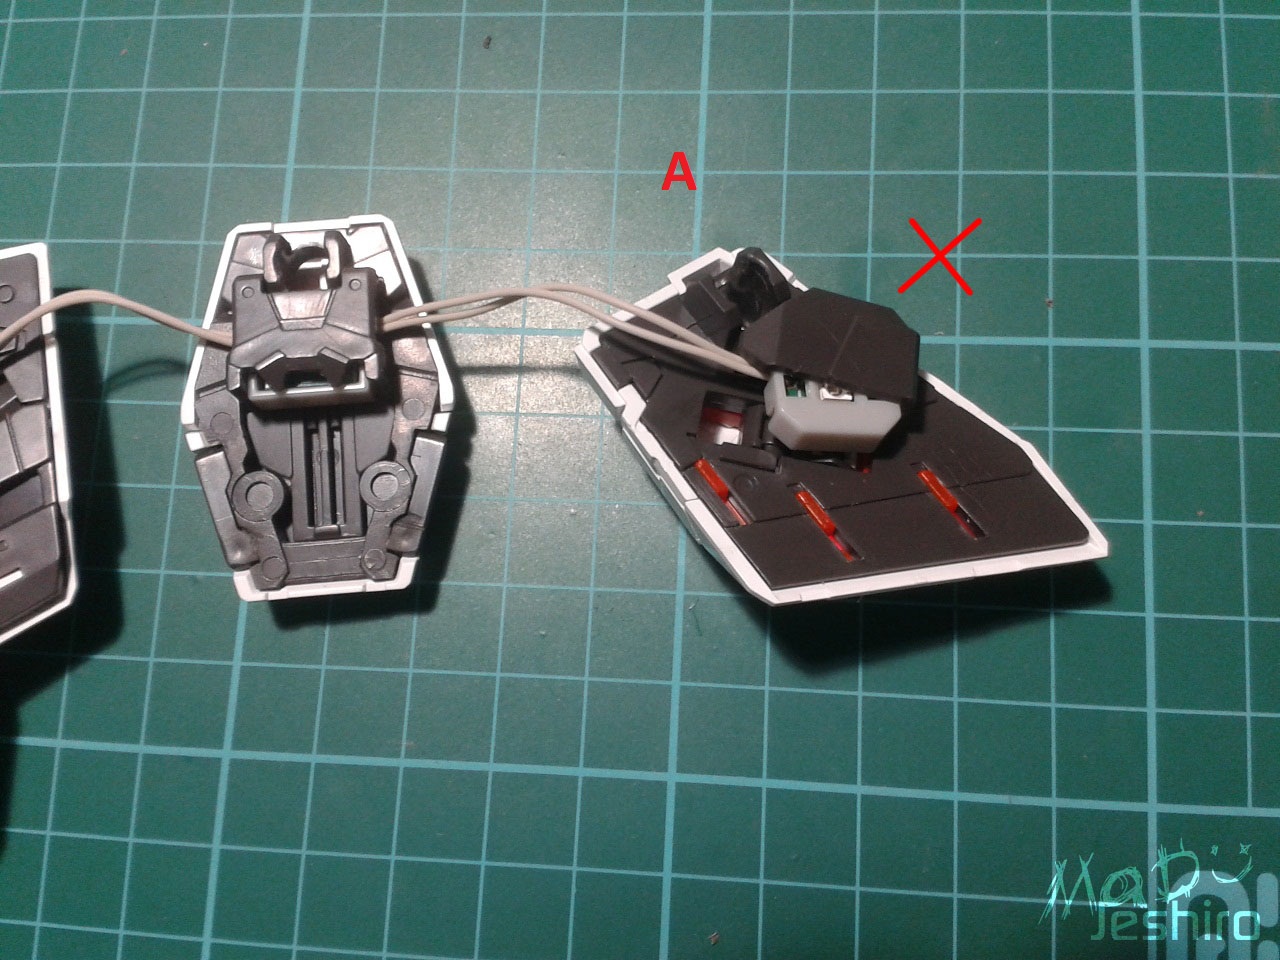

If you notice in picture A, the LED is facing the opposite direction. That means the light will face towards the cover and not on the pysco frame. The correct position is in picture B where the LED is facing the psyco frame and you can see the PCB (printed circuit board) will point towards the cover.
Again, SOME of these manuals from other brands shows certain drawings for this part of the instruction but that doesn’t mean it’s correct. Always think outside the box. I am not a specialist when it comes to LED or putting lights inside a model. here in Dragon Momoko's case, there wasn't any misleading or wrong instructions. I am just sharing this info for others who might overlook this.


Anyways, this is what it looks like when you are finished attaching all of them. It looks like a belt that will be strapped around the waist. The locks or covers for the LED have minor detailing as well that makes them less “dull”.
Now let’s take a look what are the features in the Waist Unit.


Even in Unicorn Mode, the detailing makes up for the simplicity of the design. I’m sure it will look good when painted especially when applied with some masking skills. Looking at the detailing here in back skirts just amazes me.


The range of movement is also good and you can see that the back skirt can be lifted up that much. The front skirt also shares the same feat and can be lifted up to that certain angle. I am pressing it with my finger because the wire is pulling it down. There are no problems here for the side skirt when you lift it up too.

This is the clamp (P6) I was talking about regarding its issue. On my case, only the left front skirt has the issue and it gets removed so easily when I try to do the transformation gimmick - it pops off. It’s not a big deal but it’s kind of bothersome to fix it repeatedly. This may be an isolated case and please share some info if there are any issues here in the waist I might have missed.


The Destroy Mode is just awesome. I love the look on the MG version but the extra gimmicks here in the Perfect Grade is really cool. I didn’t know that this lower section can be pulled down a bit and show more of the psyco frame (A).

The side skirts don’t have any extra gimmicks or new features but it is still good because of the extra details on the parts.

The back skirt also shares the same gimmick with the front skirt. You can pull down the lower section and extend its length.

I also experienced another loose part – the C11 or C12 tends to get removed easily when I pull it down.
Other than those 2 I've mentioned, I haven’t encountered any major other issues here in the waist. The only thing I am more concerned here is if the LED’s are working. I already performed a light test and it was still okay.

I will add the panel lines later and minor coloring using uniball signo after a short coffee break. :)
Arm Unit:

And here are the parts for a single arm. I have included the parts for the Upper Body Unit or Shoulder Armor Unit. Yeah it's upside-down and I apologize for that. :v
I forgot to rotate the image before I placed the watermark. But it's not a biggy.

The construction manual will show that you need to add the wires to this point before completing the whole arm. You can see in the picture that there are cavities where to insert the wires.


This is the LED that you are going to use. It has a LED on the end and another one on the middle. I am not sure what is the meaning of LH and RH but you can say it as Left Hand and Right Hand. XD

I will share the gimmicks and issues of the arms later after some nice coffee break. :)


So here is the Arm Unit in Destroy Mode (right arm) and Unicorn Mode (left arm).
The length difference is also noticeable because of the transformation gimmick. If you will place this inside a shelf, you might want to measure the height from the surface to the tip of any weapon above the v-fin. Consider factors like adding effects on the javelin, if the javelin is unfolded, and/or if the weapons are attached on the mechanical arms on the weapon rack. I will start with the issues first.


As always, the tight pegs and joints in the inner frame and psyco frame are affecting the transformation gimmick. You can see that the left arm have really visible seams and I don’t want to force them in closing in.

There’s also a problem when you transform it in Destroy Mode. The upper part, where the beam saber is placed, tends to get removed if you pull it sideways. I suggest you slowly slide it outward when performing the transformation gimmick. The manipulators don’t have an issue but mine encountered a really stressful one. The palm piece (A1-11) for the right doesn’t fit perfectly but the left one doesn’t have any issue. I had to trim the smaller pegs and add/used super glue here.


Now for the articulation, it was great. The Unicorn Mode may be limited by just a few degrees but it can still bend that much.

Compared to the MG version, the PG version offers more gimmicks that will highlight the psyco frame inside. I know that most of you are already familiar with this but I am pointing these out for others who haven’t check the PG Unicorn. You can see that Number 1 can be slid down and Number 2 can be pulled up. The Number 3 also shows more psyco frame parts that you don’t usually see in the MG version. Of course, credits goes to Bandai for creating such cool gimmicks.

These parts on the arm can be lifted up as well which is already featured on the MG version.


The manipulators have tight joints so you might to take extra caution when moving each finger. The finger can be folded that much if you check the image.

The upper body unit (shoulder armor) doesn’t have any major issues. The tight parts and pegs were the only things I noticed here. The part E29 however, tends to get removed so easily during transformation. This is the white piece that covers the thrusters on the side.
So that’s it for the arms and now we can check the Head unit.
Head Unit:

Perfect grades are known for extra gimmicks that you don’t usually see in the other grades. And that’s what you can get here in the Head unit of the Unicorn. Because of the scaled-up size, there are now more parts for the inner frame and separated psyco frame parts as well. There’s an extra fin that can be used to replace the foldable v-fin. This is just an option if you just like the Unicorn Mode.


Here’s the LED attached on the PCB. It doesn’t have any casing so extra caution is needed to avoid accidents or scratches.


The parts were tight again making the transformation gimmick more troublesome.
Anyways, the Head looks great and extra detail created by Dragon Momoko makes up for the simple design.

I applied some blutac on the v-fin because this is the main issue on the head. When you fold them, only the lower portion is flat. And then it starts to separate up to the top. I’m not sure but I am think it’s the magnets on the lower portion. It may not be a good idea, but they should have placed the magnets near the tip. This isn’t a big deal because you can use the other forehead fin.


Here in the Destroy Mode, the two cheeks doesn’t fit well, “if and only if” you move the head left or right. I’m not sure if this is an isolated case or the problem is in the wires inside. It doesn’t pop off all the way, it just moves a few millimeters away from the face.

I don’t have much to say on the Destroy Mode’s appearance since it’s already awesome. I also forgot to lift this up where a fin-like part with psyco frame will be seen.


If you want to go for the Unicorn mode, it's advisable to change the v-fin using the other one. The round parts that will hold the fin is quite tight though so caution is needed.
Just a reminder to some builders - you should remove the back armor piece of the head. It’s easy to connect the wires that way. So that’s the only issues I have encountered here in the head unit.
Backpack Unit:

These are the parts for the backpack unit that offers good parts separation. Sorry if it's upside-down again. :v

The first issue is the psyco frame you see here doesn’t fit well – it was very tight. I already snap-locked this portion but it was very tiring. You can see that there’s still a visible gap near the surface.
The second issue some customers might encounter are the red psyco frame that looks “melted”. The I1 and I2 sprues have badly molded parts and this will affect a lot of the mechanism for transformation. This is a factory defect and I think you can ask for a replacement but it will take some time. There may be other runners aside from this one that has a similar issue.


Okay, if you remember what I said on the waist unit regarding correct LED position, this is one of them. As you can see in the image, the LED or the board is placed on a certain direction. The light may go upward or downward. You might say the light will still reflect or bounce on the other psyco frame parts so there is no need to be so precise here. But if you want to focus your light on a certain part on the backpack, it’s not bad being a little meticulous. :)

Another note is to check the pin’s position or connectors to avoid breaking them when you start attaching them together.


After a hard battle against the tight parts, I have finished the backpack unit without any damages. Here’s what it looks like in Unicorn Mode. I will add some metallic red here for some added color.
I would like to add that the beam saber connectors (brown - P32/P33) have an issue here. They also tend to pop off from the PC socket parts when you move them.


The Destroy Mode still looks cool and with the added feature where you can slide the lower part down. I remember the MG version not having this gimmick. The two sides can be pulled sideways to show the extra thrusters.
And that’s it for the backpack unless I overlooked something (problems).
Weapons:
Dragon Momoko dumped a lot of weapons here aside from the usual shield and beam rifle. In this kit, you get another shield, 2 bazookas, 2 javelins, and 4 Gatling guns (or 2 dual Gatling guns). And the very thing I noticed here in the weapons is that they don’t have the same uber detail like you get from the main unit. Base on the design, it seems Dragon Momoko didn’t put this into consideration. The weapons still looks cool in their original design, but it could have been nice if they added some extra panel lines. Let’s take a look at the Unicorn’s armaments.
Beam Rifle:

Nice parts separation and they were actually more than I expected.

The issue is still the tight parts and my fingers are hurting already for a whole week. >_>

You get the usual feats where the handle can be moved to a certain degree.


You can also pull the front part of the rifle giving you that gimmick of removing the cartridge or ammo clip. Plus, there’s another runner here that will give you an extra rifle magazine. You can attach this extra ammo on the back skirt slots. I really hate these redundant parts. I have to clean 20 pieces of them. :/

There's an extra magazine or clip that can be attached on the back skirt
Bazooka:

Not bad on the parts separation here in the Bazooka. Aside from the usual tight parts, you get to clean the nubs on the middle section of some of these parts. Talk about bad gate placement. But at least, that’s your only issue here.


The Bazooka is really huge and it can be extended even further because of its sliding mechanism.

You can see the difference in length here in the picture.

If you are planning to attach this [bazooka] on the weapon rack/mechanical arm, you might want to replace this extra handle on the side. The replacement part will have a female peg where you can attach it on the mechanical arms.


The bazooka’s ammunition or cartridge locks into place using this slot. The cartridge has a hook-like lock.
Gatling Guns:

Just because the Gatling guns feature few parts doesn’t mean it’s not challenging. Remember, you will build 4 of these. :)

Lots of tight parts as always and this one here is a good example. The other half doesn’t fit perfectly and the problem is that the female pegs might be narrow. I scraped them up and pressed the two against a wall. I used a cloth to avoid scratches.


So these are the Gatling guns – the one on the left is connected, and the other on the right is still separated. On the manual you can disassemble the shield’s connector and attach it here in the Gatling gun. This will give you the option to attach the shield or javelin + shield.


It doesn’t have any other gimmicks aside from the handle that can be folded up or down.

You can also rotate these lenses to a full 360-degree. And this thing on Number 3 can be moved to a certain degree as well.
I’m not sure if it’s possible, but it would be cool if you can modify it and make the barrels rotate.
Shield:

Before I started cutting the parts for the shield, I noticed these stains. It’s not quite visible here in the picture but there are drop-like splashes everywhere. Good thing I remembers that some of the white sprues have these stain. Wash them using dishwashing liquid or just swab it with a swab soaked in lighter fluid.

Anyways, here are your parts for the shield. It was very simple but the detailing done here is remarkable.
I forgot to take pictures of the shield. But the good news is that there are no issues or any odd problems here. :D
Beam Saber:

You get the straightforward beam saber with a separated cap on the end.
Beam Javelin:

The pieces are almost identical to the ones from MG version. There were just a few tweaks so you can do a lot of other gimmicks with it. As I mentioned on the Sprues Section, there are white parts that you can use as an alternative to add more color to the javelin. Using just the brow parts would look boring in my opinion. I had some problem from the second issue so I resorted in using the brown pointy piece (G1-3) for both javelins.

I think it’s best to start with the issues here in case you are already building the kit. First is this section – tight pegs as always. I had to trim the inner portion of the female peg (Part B - G1-6) so it can fit nicely. Just don’t overdo your sanding here in the male peg of Part A or scrape too much of the Part B.

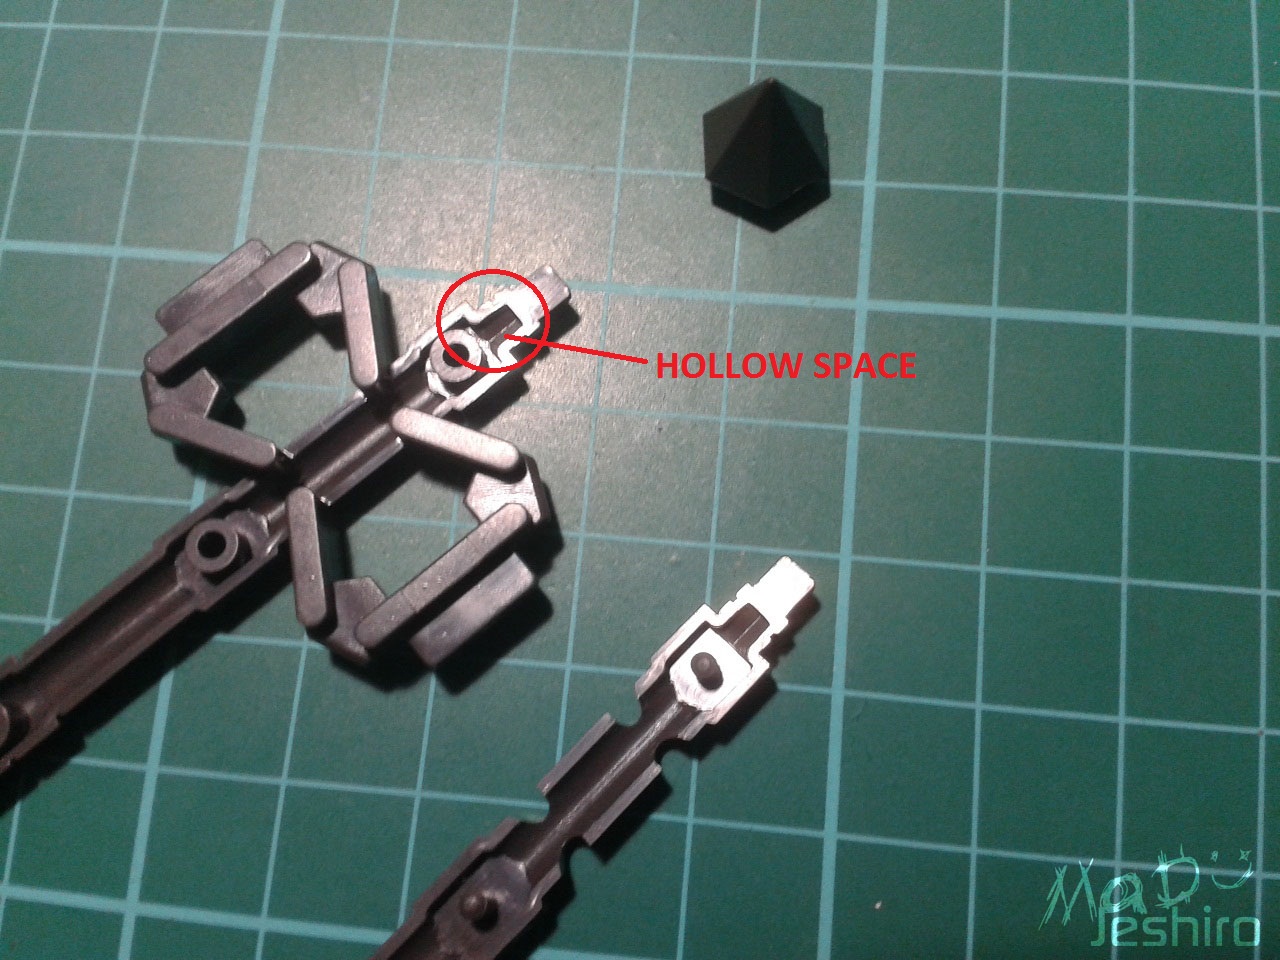

Second issue is this part. The problem this time is that the part (G1-17 and G1-18) is quite fragile because there’s a a hollow space on the back. (check picture). This may not be an issue but you will have to insert this pointy piece (G1-3) on top of it – it was tight. What I did is trim the tip a bit until it fits perfectly, not too loose or not to tight.


The third problem is this connector (2nd picture on right). Either the rectangular slot is narrow (B) or the peg (A) is too big for them to connect perfectly. I trimmed the slot instead of the peg.

So here’s the beam javelin where the other one has the effects attached. It is divided into 2 parts – the one that looks like an axe and the other that looks like a spear. You have lots of options here but I forgot to take pictures of them.

If the beam javelin is not in use or in Unicorn Mode, the red psyco frame is hidden.

You can fold the beam javelin even further and it will look like this.

And when in Destroy mode, you can see the red pysco frame giving more color to the weapon. I think this feature is in the MG version too, so credits go to Bandai for these ideas.

If you unfold the 2 parts, you will get this really long weapon where the spear is on the other end and the axe on the other side. The other option is that you can remove the spear-like tip and connect it on the handle attached on the axe. I will show this on the Completed Model in Destroy Mode. I used a measuring tape and it was at least 25 inches.
So that’s it for the Javelin and it’s the only weapon with a lot of minor problems compared to the bazooka.
Weapon Rack/Mechanical Arms:

I don’t know what it’s called so I will just use the word Weapon Rack.

I forgot to add these extra pieces again. >_>

There are lots of tight parts here and it is really annoying if you get that noticeable seam line. Scraping the female pegs is a good idea but it might get loose from time.to time, especially when you keep moving it. You will see these seams in the articulation portion below, and ignore them please. :/

The main rack where the mechanical arms will be attached can be moved this much. (check picture)

You can also move this sideways but I’m not sure if it’s a perfect 180-degree angle.

The main peg that will be inserted on the backpack can move up or down.

I noticed that there are 7 female pegs on the rack and there are only 4 of the mechanical arms. This gives you the option of choosing where to insert each connector. But it could have been nice if there was a fifth mechanical arm for the middle female peg. Of course you will need another shield here or bazooka. :D
The mechanical arms are divided into 3 segments. So yeah, this part has good articulation in my opinion.

If you move the mechanical arm outwards, you will see the limits how far it can only go.

But if you move or fold it inward, the range of movement is better.

Aside from the very tight parts, I think there were no other issues to mention here. :)
Extras:

There were actually more items that is supposed to be counted as “extra” in this kit. But I will just feature this one here and the other extra parts on my final comments below.
I find this handy especially if you want the Unicorn Gundam to hold the beam rifle. This is a good option instead of using the articulated manipulators. The handle will be locked into place so there won’t be a problem that the beam rifle will fall off from sudden bumps. I haven’t tested this on the javelin and gatling gun but I think they are just fine.
There are no issues here and the only noticeable factor is that the white hand guard doesn’t have any details. It’s just a plain smooth surface.
Decals:

This is my favorite section when building model kits – decals! :D
Again, this is a waterslide decal and you will get a huge sheet. I think this is bigger/longer than A4. I cut it in two because my scanner isn’t that big. Yeah…I scanned the decal and I will reprint it for future use. :P
The text written on the sheet were wrong , like the “Caution” word became “Gaution”.
I’m not sure if this is an issue or good news to others, but the markings are easily removed from the backing paper after soaking it in water for 5 seconds. Yes it only took 5 seconds and you can already place it on the parts. It was really fast that I managed to clear all the markings from the construction manual and added more (improvised) within a day. For my side, it’s good news as long as the quality is still great and it was. But if you want to be sure, you can apply some top coat here. I’m not sure if it’s still necessary to use Mr. Mark Softer here.

The other half of the sheet is meant for the weapons; gatling guns, bazooka, etc. But there were few caution seals or markings that you can place on the main model as well. This part of the decal sheet isn’t instructed on the manual and you can use the manual for Full Armor Unicorn from the MG line.
I want to share some ideas for those who love applying markings or seals to add “life” to their model kits. After placing all the needed markings using the construction manual (on any kit), you will get a lot of extra or unused markings. Expand your ideas by combining more than two markings and create NEW ones.

Here’s a little sample of what I did. I got an idea while looking at the sheet and I used these two markings or seals. I think you will notice that they were already cut off, but that’s what they look like on the sheet.

I will place these markings on this part of the leg, just below the gray portion.

I cut the markings again into several pieces while making sure that each text or symbol is safe. I need this red square and the red “RX-0”. The “Unicorn Gundam” marking has a huge space so I had to cut it and reposition them.
And here’s the result..

It might be off for others but I like it. I hope this idea can give others some option in detailing their gunpla. I am still a straight builder and painting isn’t part on my plans YET, so this is the only way I can add more “life” to my projects. :)
If you think this is a little risky then you can try some other methods without cutting the actual marking. You can just add them on certain areas or just place near another marking. Here are few examples of what I’m saying.


These gray lines don’t have these black texts and I just placed them to add more detail. I used the images on the manual as reference. I also added a few more using the Unicorn logo and the red "Project UC". These are just samples so there's no need to copy them. I just want to share the idea that you can expand adding minor details with decals.

I love using decals but placing them on the same part over and over again is somewhat tiring. The battle continued for 2 days and I was already finished.

Here’s what left of the markings.
Completed Model:
Unicorn Mode:
I’m glad that I have finished the kit and it was a really fun and challenging experience.
And please let it slip if my pictures are blurry or bad. I don’t have a mini tripod for my cellphone and my hands were shaking a lot. :/
Ignore the seams because I prepared it for Destroy Mode. I will deliver it my friend in that form. :P


MOVEMENT TEST


It’s amazing that the arms can move this far. I thought the shoulder armor would hit the body.

You can only lift the leg this far up. The front skirts reduced the range of the leg’s movement, but it’s not much of an issue since the kit will just stand on the base.


A little reminder that if you want to use the Weapon Rack w/ Mechanical Arms. You should connect the Unicorn Gundam on the stand first. Adding weapons on the rack also adds weight and will pull the model backwards. Using a single shield, a single bazooka, or a combination of both like on the picture doesn’t affect much of the model’s balance as long as you know where to position them.
Destroy Mode:


I forgot to mention that I didn’t use the foil stickers because I received them late. Even if I did received them on time, I will have doubts if I should use them. So there are no bright red sections on the psyco frame parts here in the shoulder armor, waist and arms.

I don't have an idea how to position the bazooka just like in the construction manual but it was close in this format.
The site can upload a video with a size of 100 MB or less. You can check this link (CLICK HERE) that will direct you to our page in facebook. It's the short video on what the remote can do. I’m sorry if I don’t have any good editing skills that I can use for the video, so you will hear random music from our neighbor. LOL
I'm supposed to ask my cousin to edit this but he was also busy.
Now here are my final comments for the kit’s characteristics.
 |
| Image based from GDC design |
Plastic Quality: 7/10
The plastic is good and I like how they mixed several parts with that “rough” or matte look in it. I didn’t encounter any flashes on the parts. I did however notice these lines on the middle section of several parts. (check picture)
Sanding them was a good idea at first but it seems the plastic is too soft that the part’s surfaces are easily scratched even with 1800-grit sandpaper. I don’t have any 2000-grit sand papers so I resorted in using the hobby knife or X-Acto knife instead. I am not a good advisor but I will suggest using a finer grit if you want to sand the white parts. The X-Acto knife or any other sharp cutting tool works too, as long as the nubs are cut down flat from the part’s surface. Only the white sprues were noticeably “chewy” or easy to cut and the brown ones were the same with the Destiny they released before. Good thing that they didn’t use any black parts here. They have been bad in producing these black sprues and the quality of it is really bad that TTH can “outshine” it.
But on the bright side, the stress marks when you remove/cut them out of the sprues can be cured so easily. Because the plastic is a bit soft, using your fingernails as a buffer can remove the whitish marks. For me the plastic quality is great and if not for those lines you saw in the picture, I may have given it an eight.
I even received information that there were sprues with bad molding or the parts looks “melted”. This is a factory defect and Dragon Momoko should be strict on this matter.
Assembly: 6/10
I will be honest in this section – it was a real pain building the whole model. Starting from the base to the last piece of weapon, all of it has a lot of tight joints, pegs, etc. I had to trim or scrape several pegs just to fit them together. If I will rely on force and press them hard, it might produce stress marks or break the pegs connecting each part. It will be hard to pull them or seprate them again and the seam line will be wide. Of course I had fun while building it beucase it’s my first time building a Perfect Grade Unicorn. But I the hassle of this issue took its toll; time-consuming and tiring. If you have the knack to clean them up or have the patience to do so, then it’s no problem. But I’m not saying that you shouldn’t buy the kit just bcause of this issue.
Detailing: 8/10
The added or new details applied by Dragon Momoko on the Unicorn Gundam are superb. And because of the extra panel lines and raised parts, builders might get some ideas in painting them in gray or silver. I mean not the whole kit but some details in gray color. I don’t know if the Bandai version already have those details on some of the inner frames, but it was also cool. I had fun adding metallic red on those oblong vents. Cleaning might be tough if I had picked the Uniball Signo Black and I’m glad I used the mechanical pencil instead on those panel lines.
If you can recast the V-fin from the Unicorn Banshee Norn, then you will have the option in painting it in black and get the Banshee Norn with the same detailing. Like I said many times, I don’t paint so I don’t know how you will change the red pysco frame into gold without reducing the light when the LED is turned on. Maybe it’s better to wait because there’s a possibility Dragon Momoko might release the Banshee Norn.
So again, Dragon Momoko clearly did a good job on adding more details on the Unicorn Gundam. I could have given it a 9 if they also modified the details on the weapons a bit.
Articulation: 7/10
I think my rating is just fair for this kit. Yes, there are lots of moving parts, but most of them are meant for the transformation gimmick. Movement range for the legs and arms are not bad but it’s not that good either. Maybe it’s the design that reduced its movement range and Bandai should have planned it through. I can still put the Unicorn Gundam in a kneeling pose so it wasn’t that bad. I guess I was just expecting a lot because after all, it is a Perfect Grade.
Gimmicks: 8/10
This is where the kit highlights its main feature. The transformation gimmick from Unicorn to Destroy mode is really cool. Plus, Bandai designed the legs to have open-hatch gimmicks where you can see more pieces of the red psyco frame. Like you’ve seen on the shoulder armor and waist, there were several parts that can be extended and this isn’t featured or seen on the MG version.
I will consider the LED as part of the gimmicks because the inner frame was obviously designed for them. The intricate and complex design where to place these wires and LED casings were amazing, thanks to Bandai.
Weapons: 8/10
Normally, you would only get the 4 beam sabers, 1 beam rifle and 1 shield. But here in Dragon Momoko, you will get an addition shield, 2 bazookas, 4 Gatling guns, and 2 javelins. That’s more than enough to give Unicorn some extra firepower. LOL
It’s not complete to build the Full Armor Unicorn, but it’s almost near its completion because you already have most of the weapons. And even if you don’t have the rack on the back where the fuel tanks are attached, you still get that other weapon rack with mechanical arms to hold these weapons. The other option enables you to place these weapons (shield + javelin + dual gatling) on each arm like you saw on the Completed Model section.
I know this is already a nice giveaway, but they should have added another beam rifle. I also hope that they can sell some of these weapons separately and/or create the Armed Armor DE.
Extras: 8/10
I consider that weapon rack and mechanical arms as an extra so you get a lot of freebies for this kit. You may not be able to get the Full Armor version, but having a weapon rack on the backpack with mechanical arms enables you to hold the bazookas.
Aside from the extra weapons I mentioned above, you also get the remote that lets you play with the LED inside the model. I don’t have any good batteries so the lights weren’t as bright as the first time I tested it. But yeah, the remote was a nice factor to point out in this section. I’m not sure if Daban or Bandai included a waterslide decal sheet, but it was a nice move again for Momoko to include one.
I hope they also release another set of sprues of the psyco frame parts in green or bluish color. I think you’re getting the picture if this was a possibility.
Patience: 9/10
Yes it’s a nine! If you are planning to clean the mentioned issue from the Plastic Quality section, it will surely consume a lot of time. Not to mention there’s the list of weapons with repeated parts. I’m not saying that you should rush or hurry to finish the kit. What I’m saying is that you should have a lot of patience if you’re taking down the “slow building” route. Other builders get this so-called burnout especially if you will also use sanding on each piece/part. It took me 2 months to finish the kit (straight build) and I think it’s already fast for others.
Overall Rating: 8/10
The kit isn’t perfect because of several problems but Dragon Momoko pulled this through by throwing in those freebies and nice detailing. All of those issues I have mentioned can be counted as “minor” ones and they were pretty much basic problems a builder can encounter. That means, this kit still stands with good factors against its flaws - A “solid kit” indeed. I haven’t checked the Daban Model version, but if you were to pick between the two, Dragon Momoko is a good choice. Like I said, you have lots of options in adding more detail using your painting skills because of the overwhelming details from head to toe (wait.. it doesn’t have any toes :v ).
However, if you don’t want to face these issues or if you want to challenge yourself by creating/adding your own detail just like Dragon Momoko did, then Bandai is there for you. It’s a very long wait but it is surely worth it. You can also get the “Awakening” version or Final Battle version I think. Plus you can get the whole Full Armor package in Bandai. I recall Daban Model also produced/released the add-ons to build the Full Armor Unicorn. A certain builder said that Daban add-ons to build the FA Unicorn is 100% compatible with Dragon Momoko, so that's great news if you want to complete the set.
And if you will just have to bear with the issues without spending much, then Daban or DM is your shortcut. At least you now have more options to choose from. I can’t remember much of what I have experienced in this kit and I will add more if I found out some new information. That’s all for my short review ( You call this review short? D:) and I hope you continue your support by taking a look at my other reviews or visiting my friend’s facebook page by clicking on the link below. Correct me if there are typos or wrong terminologies used on my review. :)

